The best cheesecake I ever had

I am not sure how to write this blog piece. Cause I think I could spend 24 hours thinking about it and still I would not be able to describe this cheesecake. Does it say enough when I tell you this cheesecake was eaten by the two of us in just one day? Although I bake regularly I mostly share it with friends and relatives, since I am not really a sweet toot myself. But this cheesecake was like kryptonite to me. This cheesecake was also the reason I bought BBC Good Food magazine for the first time ever. It cost me 11 euro’s but the cheesecake makes it the best spend 11 euro ever. Good food serves it with a nice summer berry mix… I don’t. The cake doesn’t need it. It’s a star all by itself. I honestly think it is even better without anything else on top of it! And yes I tried… I munched a part down with some strawberry sauce and I ate part just plain. Plain for the win!

 INGREDIËNTS

200 grams of shortbread cookies
50 grams melted butter
600 grams of soft cheese (I used Philadelphia)
200 grams of crème fraiche
1 teaspoon of vanilla extract
175 grams of golden caster sugar
2 tablespoons of plain flour
2 eggs
 

 Heat the oven to 180 degrees Celsius. Grease and line a loaf tin with baking parchment.

The recipe states that you need to tip the shortbread in a food processor. And I agree that it is the easiest way to crumble it down. But it isn’t the funnest way. I tipped my shortbread into a zip lock bag and bashed it down with a bottle. Yes I have a food processor, but bashing with a bottle is a lot more fun!

Add the melted butter and mix well. Then press the mix into the base of the loaf tin.

Beat the cheese, crème fraiche, vanilla and sugar until smooth, then mix in the flour and the eggs until smooth again.  Poor the mix into the tin and smooth the top with a knife. 
Bake the cake in the oven for 10 minutes, then turn down the heat to 120 degrees Celsius and bake for another 80 minutes. The cake is done when there is just s light wobble in the centre. Turn of the heat and let de cake cool completely in the oven.
Place it in the refrigerator to firm up.

Recipe from BBC Good Food Magazine August 2010

Almond mascarpone muffins with white chocolate chips

The husband has been working nightshifts the past couple of days and its been a real change in our family lives. He comes home at 7.30, hits the sacks and comes back to life around 3 in the afternoon. He insists on having diner with me at night so we still get to spend some quality time together. But that left me a little bit hanging on what to serve him for breakfast in the afternoon. We eat around 6 in the evening, so what could I give him when he gets up? The answer came to me in the most decadent muffins I ever made in my whole entire life. They combine so much lovely flavours that some people might state that it’s a little bit over the top. And to be honest… it is. But I am not apologizing for it! My hubby deserves something rich and sugary when he awakes in the afternoon. He has been making money for our little family and fighting his sleep (well the first few days he was. Now its getting better.) So honey, these ones are for you!

INGREDIENTS


125 grams cake flour
125 grams of soft butter
60 grams of almond flour
100 grams of white sugar
2 eggs
3 tablespoons of amaretto
65 grams of white chocolate chips
250 grams mascarpone

In a bowl stir together the flour with the almond flour and a pinch of salt.
Then mix together the soft butter with the white sugar until you get a creamy mixture.
Now add the eggs one by one and mix well.

Add the amaretto, the flour and the mascarpone and keep mixing till all is combined.
Then stir in the chocolate chips.

 Place some paper cups in your muffin pan and spoon in the batter. Bake to muffins for about 20 minutes in a hot oven at 200 degrees. Let them cool on a rack.

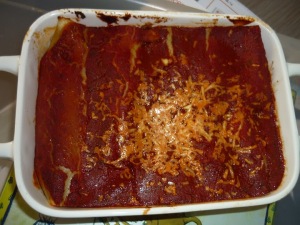
Cannelloni with ricotta and minced meat

The husband and I are huge fans of Italian food, So I am always happy to try out something new and exciting. Normally I use a very basic cannelloni recipe à la bolognaise. It’s a wonderful recipe and I just know I ll keep using it till I am old an grey. But sometimes I want to try new recipes and new flavours. I found the base for this recipe while looking for some stock cubes on a website. The website suggested to use the cubes in a Ricotta cannelloni and I was won over. The idea of a ricotta cannelloni without spinach sounded like something different. So I added a little bit of this and a little bit of that and I ended up with those lovely creamy cannelloni.

 INGREDIENTS
8 tubes of cannelloni
½ red onions finely chopped
125 grams ricotta cheese
1 jar of tomato sauce (I used home made sauce about 250 ml)
50 grams of grated parmigiano reggiano cheese
½ red pepper chopped in small cubes
½ green pepper chopped in small cubes
200 grams minced meat
30 grams of pine nuts
2 teaspoons of Italian herb mix
2 tablespoons of olive oil

In a large sauté pan over medium heat warm the olive oil. Add the minced meat and crumble it with a fork while it turns lightly brown and is cooked through. Now add the onion and the peppers and stir fry this for a about 10 minutes.
Now add the ricotta to the pan and mix it all together.
Season with a little bit of salt, pepper and the Italian herb mix.

Now add 25 grams of parmigiano reggiano cheese and the pine nuts to the mixture.
I had to pre-boil the cannelloni before using. Be sure to check the instructions on your package before using.
 Now fill the tubes with the meat-ricotta mixture. I did this using a small wooden spoon. Look out that the tubes don’t tear up completely.

 Place the filled tubes in a oven dish and poor over the tomato sauce. Make sure that the cannelloni is covered completely with sauce; else it will go hard an dry while baking in the oven. Now sprinkle with the remaining parmigiano reggiano cheese. Cover with foil and bake for 20 minutes in an oven of 200 degrees. Uncover and bake further until the cannelloni is golden brown an bubbling, this takes approx. another 15 minutes.

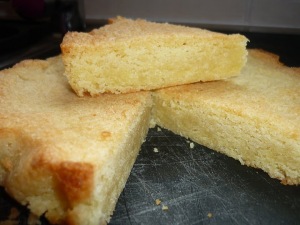
Dutch Boterkoek

Have I told you how I love the Netherlands? Well I do. At least once a month we drive up there to enjoy a day full of “gezelligheid”. When other people dream about a life in the hot sun of France, I dream of living in Bergen Op Zoom or Utrecht. I am not sure if there is anything I don’t like about the Netherlands. No wait there is. I don’t like their so called beer that tastes almost like lemonade. But that is kind of it. All the other things I like. Our monthly visit to Holland always ends with a visit to Albert Heijn where I can go wild and end op with a very high bill on groceries. One of the things I always buy is boterkoek.

Boterkoek is unique to the Netherlands. It’s a rich, buttery dense cake which is probably not good for your waist and heart considering the amount of butter that is used in it. But there is nothing like it in the world. Its not cake, its not a cookie, it certainly is not pie.  You should give it a go yourself, its quit an experience.
Like I told you I always buy boterkoek but it is finished fast in our house. So I was on making my own batch of it. From a Dutch friend I got a recipe her mother used to make and she made me promise I would only use really roomboter (creamy butter?) in the recipe. I crossed my heart and started baking! And you should too! Its such an easy recipe and for once we don’t have to think about our diets, right?

 INGREDIENTS
250 grams of all purpose flour
250 grams of roomboter (creamy butter)
250  grams of white castor sugar
8 grams (or one bag of vanilla sugar)
a pinch of salt
½ teaspoon of vanilla extract
some lemon zest
1 beaten egg

Put the flour, the butter, sugar, salt lemon zest and ¾ of the beaten egg into a bowl. Its important that the butter is at room temperature and that you slice it into thin piece. Now mix together using your hands. You hear me! No use of mixers or kitchen robots, just your hands! When the mixture becomes a (I must admit greasy) dough let it rest for 15 minutes in the refrigerator. In the mean while butter and flour you baking pan.

Now add the dough to the pan. This is a thick dough so you need to push it a little in its form.  Brush the rest of the beaten egg over the dough and decorate using a fork that you push gently into the dough make stripes.  Now bake the boterkoek in an oven at 200 degrees Celsius for about 25 minutes. The boterkoek should have a golden colour and feel a little soft when you touch it. Let the koek cool down completely before removing it from its form and slicing it into squares.

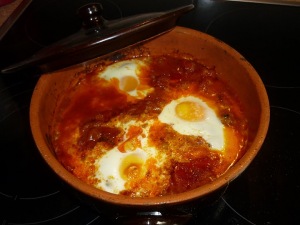
When you ask people to name some famous British chefs most of them will come up with Jamie Oliver, Gordon Ramsey and Nigella Lawson. Not me though… No I am madly and deeply in love with the cooking of Rick Stein. Rick and I had some great times in front of my TV. I sailed the canal du Midi with him, I ate dumplings with him in Phuket and I followed him around the Mediterranean. And that is still my favorit..his Mediterranean escape. I loved the show with that typical cuisine and the lovely views. I soaked in all his tips and one moment I thought I was going delusional in front of my tv cause I could almost smell the sea! I was overcome with joy when I finnaly got my hands on the Mediterranean escape cookbook. The first recipe I tried from it was this lovely kefta Mkaouara or a spicy egg, meatball and tomato tagine.
But although I love Rick Stein and everything he does I need to tell you how happy I was with the adjustments I made to the recipe. Without the extra spices I used I think the flavour would have been kind of bland. The husband and I agreed that his recipe could never be “spicy” like the title mentioned. I wrote my added spices in the cookbook and I saw the husband smile. All my cookbooks are tweaked with little notes in the sides to make recipes “more us”.

 INGREDIENTS

3 tablespoons of olive oil
4 medium sized eggs
a small handful fresh coriander leaves, coarsely chopped
450 grams minced lamb
2 tablespoons finely chopped parsley
2 teaspoons ground cumin
1 teaspoon salt
2 teaspoons ground black pepper
1 teaspoon of hot paprika (I used some dried Harissa herbs I bought in Tunesia for this)
2 tablespoons of raz el hanout
1 medium onion, finely chopped
800 grams of canned chopped tomatoes
2 garlic cloves crushed

 Start with preheating your oven at 200 degrees.

Now for the meatballs put the minced lamb, parsley, 1 teaspoon of cumin, ½ teaspoon of paprika, 1 teaspoon of salt and 1 teaspoon of pepper into a bowl and mix together well with your hands. When all is mingled together well form the meat into small balls. (Approximately 2,5 cm)

 Heat two tablespoons of olive oil in a shallow tagine or a frying pan and brown the meatballs briefly on all sides. You don’t need to cook them through, they just need to get a lovely golden crust.  Remove the balls from the pan and transfer them to a plate.

 Add another tablespoon of oil to the pan and add the onion to it. Cook it very gently for about 5 minutes until soft and tender. Now add the canned tomatoes, 1 teaspoon of cumin, ½ teaspoon of paprika, 1 teaspoon of pepper, the garlic cloves and 2 tablespoons of raz el hanout to the pan. Let this simmer gently for 20 minutes. Season with some salt to your liking.

Now return the meatballs to the pan and mix them together with the sauce. If you don’t have a tagine now is the time to transfer the mixture into a shallow oven dish. Make 4 slight dips into the mixture en break the eggs into each one. Now place the tagine or the oven dish in the oven for about 15 minutes or until the eggs or cooked.

Scatter with the chopped coriander and serve with some couscous like we did or some lovely Moroccan bread to dip into the sauce.

Recipe adapted from Rick Steins Med. Escape

Peanut butter square brownies

This weekend I was looking for a package of cinnamon I remember recently buying in my local Moroccan grocery shop. I found it in the back of my cupboard together with a jar of peanut butter that was about to expire in two months. I think I must have bought the jar of peanut butter to make fresh peanut sauce about a year ago and now it was wasting away in a dark corner of my kitchen. The hubby and I don’t like peanut butter on our sandwiches so that was no option. But I felt like brownies and I had a recipe for Nutella marbling lying around in a kitchen drawer. Nutella and peanut butter… sounds a little bit decadent no? Well it was. It was also a very filling brownie, but also very rewarding. There is just something about the salty peanuts together with the creamy chocolate that made my heart beat a little faster.

 INGREDIENTS

6 tablespoons of unsalted, softened butter
280 grams of light brown sugar
1 teaspoon of vanilla extract
150 grams of peanut butter
2 eggs
100 grams of flour
1 teaspoon of baking powder
¼ teaspoon of salt
80 grams milk chocolate
80 grams of nutella

 Preheat the oven at 180 degrees and line a brownie baking pan with baking paper.

 Take a large mixing bowl and beat the softened butter with the brown sugar into a creamy paste. Now add the vanilla and the peanut butter and mix until combined. Then add the eggs and beat just until everything is combined. Now fold in the baking powder and the salt, just make sure they are thoroughly  mixed in. Now add the flour and mingled it all very well. Now poor the batter into the brownie pan.

 Melt the chocolate au bain marie. When the chocolate is melted, whisk in the nutella till you get some kind of thick syrup. Now marble the peanut butter mixture with the chocolate syrup. The easiest way to do this is using a fork.

 Now place the brownie mixture into the hot oven and bake it for about 30 minutes.

Let the brownies completely cool down before you cut them into squares.

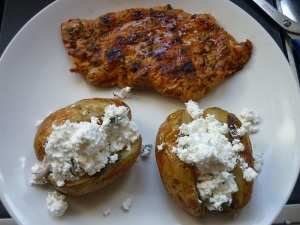
Sundried tomatoes chicken with twice baked feta potato

I love sundried tomatoes. Not the all dried out version. No I have a thing for the half dried tomatoes who bath in oil. I know it probably is not healthy. Its not good for your figure… but it is delicious as hell. So for once I just don’t care. Normally I serve these tomatoes with a little aperitif, but to make it all a little healthier I made them into a lovely marinade.

These lovely marinated chicken breast are very quick to make and taste very Mediterranean.

I served them with twice baked potatoes and some feta. I just love feta and I love potatoes, so why not combine them into this lovely dish!

 INGREDIENTS FOR THE CHICKEN BREASTS

2 chicken breasts
12 half sundried tomatoes
6 leaves of basil
½ onion
1 clove of garlic
350 grams of tomato coulisse
250 mls of olive oil

INGREDIENTS FOR THE TWICE BAKED POTATOES

6 medium potatoes
Olive oil
200 grams of crumbled feta cheese and an extra 50 grams
2 teaspoons of finely chopped rosemary
2 teaspoons of finely chopped thyme
2 teaspoons of finely chopped sage
Salt and pepper


For the chicken breasts

Lets start of with the lovely chicken breasts. This is a really fast and easy marinate that you can use for any kind of meat. I just love it with chicken. The tenderness of the chicken goes wonderful with the sweetness of the tomatoes. But enough chit chat start chopping those sundried tomatoes and the basil leaves in rough pieces. When your done, do the some to the onion and the garlic.

Now take a large, deep plate or a large bowl and combine the chopped ingredients. Now add the tomato coulisse and the olive oil. Whisk it all together till everything is nicely combined.

Now take your chicken breasts and here comes the nice part…. Bash them with something heavy till they are nicely thin. Think about your bad day at work, about your husband loosing his socks for the seventh time this week, about your kids who never clean up their toys, about the dog who jumped on your pretty white dress with his dirty pawls. Anyone let the anger flow and just bash those chicken breast!

When the chicken breasts are nice and thin, you just toss them into the marinate, cover it up and place it for at least 2 hours in the fridge.

 Now heat a pan (even more lovely is a grill or a grill pan!) without adding any more oil or butter. Now take the chicken breast out of the marinate and fry them for about 2,5 minutes at each side.

FOR THE TWICE BAKED POTATOES

Preheat the oven at 180 degrees. Now scrub the potatoes and poke some holes in them with a fork. Isn’t this a lovely aggressive diner?

Now place the potatoes hole side up on a baking sheet and drizzle them with 3 tablespoons of olive oil and some sea salt. Now bake them for about 50 minutes in the oven. The potatoes are ready when you can insert a fork easily into the crispy skin of the potato.

Now remove the potatoes from the oven and let them cool for about 10 minutes. Slice the potatoes in halve in length and scoop out that lovely, fluffy flesh into a bowl. Keep the skins on the side.

Now add 200 grams of crumbled feta cheese, the finely chopped herbs and some salt and pepper to the potato flesh. Mix this together into a creamy mixture and fill the potato skins with it. Top this of with the remaining feta cheese, some salt and pepper and return this to the oven for another 15 minutes.

Festonati with creamy ricotta lemon sauce

Pasta… if there is one thing I love in the world its pasta. I adore a plate of pasta with authentic bolognaise sauce and at night I dream about creamy sauce drizzled with some freshly grated parmesan cheese. If you ever wake me up for anything at night let it be a plate full of delicious pasta.

Unfortunately my dearly beloved husband is just not that into pasta. He barely eats a full plate of it and he complains when I put it on the table more then twice a month. It’s a problem in our marriage… maybe we need counselling…

On the other hand the pasta-hater himself makes the best tomato sauce ever and he does it with love and devotion and all that for little old me.

Sometimes he even brings home special types of pasta, just to surprise me. For valentine I got little red heart pasta one year, the other year I got pasta that looked like… well the crown jewels of a men. With Christmas he bought me little santa shaped pasta and a couple of weeks ago he brought home a bag of festonati pasta.

This pasta is one of the newer pasta shapes and is similar to penne or rigatoni. I must say I like it better then a regular penne. The shape is quit special, they are pretty big and they hold on to the creamy sauce I plunged them in.

One warning though, the festonati are quit big but don’t be deceived, they are all dente much quicker then regular penne! So don’t overcook them!

INGREDIENTS

300 grams of festonati
30 grams of butter
100 grams of ricotta cheese
50 grams of grated parmesan cheese
Juice of one lemon
The zest of one lemon
20 whole basil leaves, roughly chopped
Salt and pepper

Cook the pasta al dente. When you drain the pasta don’t forget to set aside 1 cup of the hot water you boiled the pasta in.

Now melt the butter on medium heat. Squeeze in the juice of the lemon and whisk it together with the melted butter. Turn down the heat. I know this sounds a little weird, but just believe me it will work! Now add the ricotta cheese and let it slowly melt while whisking in the parmesan cheese, the zest of the lemon and the basil leaves. The heat of your pan will make sure that the cheese melts into a creamy sauce. Using two cheeses might make the sauce a little to thick. So check the consistency and add some of the warm water you kept in a cup.

Now add the drained pasta and mingle it all together. You can top it of with some freshly grated cheese and some extra basil leaves if you like.

Indian style wedges

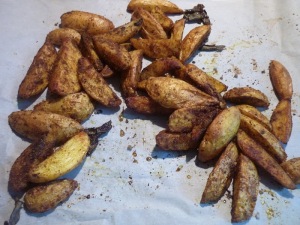
You must have noticed I like Indian curries. No wait… I love Indian curries. Most of the time I serve it with rice and papadums. But today I was craving potatoes. I am Belgian and Belgians love their potatoes. Did you know that we eat potatoes for diner 96% of the time? Well, I guess the husband and I are not a traditional Belgian family, cause I don’t think we get to that number. I would guess its around 50% with us. But sometimes I indeed crave potatoes. Not the very dull boiled potato like most Belgian people eat them. No I wanted an exciting potato. I was thinking crispiness, a little spicy and a nice warm feeling to the tongue.
So that’s how these Indian wedges came to life. I add a little of this, I squeezed in a little of that and I top it of with a little of everything.

INGREDIENTS

Potatoes (any kind will do, but I prefer a hard boiling potato.)
2 tablespoons of vegetable oil
1 tablespoon of chilli powder
1 tablespoon of ground coriander
2 tablespoons of garam masala
1 teaspoon of black pepper
1 teaspoon of ginger powder
6 curry leaves
A pinch of sea salt

 Was the potatoes, but don’t peel them. I think potato wedges should have skins. That’s what makes them so lovely and crisp. So no peeling for this dish! Just simply cut the potatoes into wedges form. Then put all the wedges together in a large bowl and pour over the vegetable oil. Start adding the herbs and stir it all together. When you use a bowl with a lit, just put on the lit and give the bowl a good shake. All the wedges should be cover with the spice mixture.
Then lay the wedges out on a baking tray cover with baking paper and place the tray in an oven of 175 degrees for about 25 minutes. Then take out the wedges, turn them around and place them back for 15 to 20 minutes.

When the wedges start to look golden brown, have a taste. They are done when the exterior is crispy and the interior is soft inside.

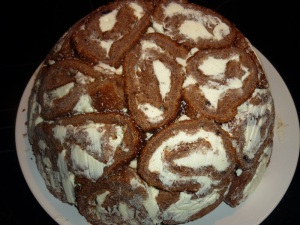
Daring bakers: Swiss Swirl Ice Cream Cake Pina Colada style

I was totally thrilled when I saw the new daring bakers challenge this month. Sunita from Sunita’s World – Life and food challenged us into making a Swiss Swirl Ice Cream cake. The moment I read the challenge it was about 25 degrees celcius in Belgium Perfect weather for ice cream and some baking. The day I actually made the cake it was about 35 degrees and I almost melted away in my kitchen. But it was worth it! Every drop of sweat, every hot breeze from my oven.. I forgot about it when I finally took a bite of the cake. It was divine, completely divine! One bite brought me into Ice Cream Cake heaven. I even forgot how scared I was about this recipe. I had nightmares about rolling a cake. Asleep I saw the cake fall into pieces when rolling. But this cake was so easy to make and I will certainly try it again.
Because of the tropical heat and the fact that summer holidays have started over here I made a Pina Colada version of the cake.
Like I mentioned in a previous blog post I am the proud owner of an ancient ice cream maker who I fell deeply in love with. I used my dearly beloved machine to make the creamy coconut ice cream and the pineapple sorbet, but don’t be afraid. You can make ice cream without a machine!

One last warning before digging into the mysteries of the Swiss Swirl Ice Cream Cake. don’t try to make this in one day. Its just to much. J It took me 3 days to complete the challenge. The first two days I made my ice cream. It could be done in one day though, but my machine was not cold enough to make two sets of ice cream. The third day I made the cake and assembled the who thing. On the fourth day I was in ice cream heaven.

 INGREDIENTS FOR THE SWISS ROLLS

6 medium sized eggs
225 grams caster sugar
45 grams all purpose flour
40 grams unsweetened cocoa powder
30 ml boiling water
30 ml rum essence
500 ml of whipping cream
70 grams caster sugar

INGREDIENTS FOR THE CREAMY COCONUT ICECREAM

3 dl coconut milk
4 egg yolks
75 grams of caster sugar
3 dl whipping cream

INGREDIENTS FOR THE PINEAPPLE SORBET

100 grams caster sugar
100 ml cold water
100 ml pineapple juice
250 grams pineapple

FOR THE SWISS ROLLS

Pre-heat the oven at 200 degrees Celsius. The recipe states that you should use 2 square baking pans from 11 inches by 9 inches each. I did not have that and I just used my regular round baking pans, what work pretty well, but I am convinced that square pans would make a better result. Brush whatever baking pan you are using with a little oil and line with greaseproof baking paper.

 In a large mixing bowl add the eggs and the sugar and beat till very thick. When you lift the beaters out of the mixture they should leave a trail for at least 10 seconds. I timed my beating and it took me about 12 minutes to get the right consistency.

 Now add the flour mixture in three batches while folding it gently in with a spatula.
Then fold in the boiling water!

 Now divide the mixture among the two baking pans and spread out evenly. (I had to use 3 baking pans to get the job done. If you don’t have that many baking pans, just let them cool down and bake a second batch in the same pan!)

Now place the pan in the centre of the pre-heated oven and bake if for about 10 minutes or till the centre is springy to the touch!

 Spread a clean kitchen towel on the counter and sprinkle it with a little caster sugar.
Now turn the baked cake on to the towel and peel away the baking paper. Trim any crisp edges. (If you use round forms like me, you could trim it into a square form like I did.)

Starting from one of the shorter sides, start to make a roll with the towel going inside. Place the roll an a rack, seam side down and let it cool down completely.
Keep repeating this for the next cakes.

Now for the filling! In a large bowl add the cream and the sugar and beat it till very thick and fluffy. Be careful don’t beat it into butter! Halfway trough the beating process add the rum essence.

Divide the cream mixture between the now completely cooled cakes.

Open the cake rolls and spread the cream mixture. Make sure it does not go right into the edges, cause it will poor out when you start rolling.

Roll the cakes up again, this time without the towel. Wrap the cake in plastic wrap and chill for about an hour in the fridge. This will firm them up and make the slicing a lot easier on you.

 Creamy Coconut Ice

In a large bowl add the sugar and the egg yolks and beat until they are doubled in size and all the sugar is evaporated in the mixture.
Now spoon under the coconut milk and the whipping cream.
Poor this mixture into the ice machine and let it “cream” for 25 to 30 minutes.
When done place the coconut ice cream for at least 5 hours in the freezer.
The downside on making ice cream yourself is that the ice cream is very rich and creamy, but also very soft. The problem is solved when you freeze the ice cream for at least 5 hours. Then the ice cream gets the hardness that store bought ice has.

Pineapple sorbet

In a small saucepan, whisk together the sugar, the pineapple juice and the water. Place the pan over a medium heat and sit constantly, till the sugar begins to melt into the water. Don’t let it boil, cause it will start to caramelize. When the sugar is totally melted into the water turn down the heat and let the syrup cool to room temperature.
In the mean while mix the pineapple with a blender into a puree.
When the syrup is cooled add the puree to the syrup and poor it into the ice cream machine. Let it cream for about 25 to 30 minutes. When done place the sorbet for at least 5 hours in the freeze.

 Assembly

Cut the Swiss rolls into equal slices (approximately 2 cm each)
Cover the bottom and sides of the bowl in which you are going to set the dessert with plastic wrap.
Arrenge two slices at the bottom of the pan, with their seam sides facing each other. Arrange the Swiss roll slices up the bowl with the seam sides facing away from the bottom, to cover the sides from the bowl. Cover the bowl with plastic wrap and freeze till the slices are firm. (I froze them for about 1 hour)

 Take the creamy coconut ice cream out of the freezer and let it soften up a bit. Then take the bowl out of the freezer and remove the film cover and add the ice cream on top of the cake slices. Spread it out to cover the bottom and sides to the bowl. Cover again with plastic wrap and freeze for at least 1 hour.

In the original recipe you add to add a layer of fudge sauce between the two layers of ice cream. I left that part out, just because I thought that with the flavours I had chosen it was already rich enough.

 Take the pineapple sorbet out of the freezer and let it soften up a bit. Then take the bowl out of the freezer and remove the film cover. Then add the sorbet on top of the coconut ice cream. Spread it out evenly. Wrap again in plastic wrap and freeze for at least 8 hours.

Remove the plastic cover and place the serving plate on top of the bowl. Turn it upside down and remove the bowl and the plastic wrap. If the bowl does not come away easily, wipe the outsides of the bowl with a kitchen towel dampened with hot water.

Slice the cake with a hot knife and serve!